> ## Documentation Index
> Fetch the complete documentation index at: https://docs.docwriter.org/llms.txt
> Use this file to discover all available pages before exploring further.
# Quickstart
> Open a folder, edit a file, and run through one agent revision cycle.
This walk-through takes about five minutes. It assumes you have already
[installed DocWriter and authenticated](/install).
## 1. Create a workspace
DocWriter works on any folder. For this walk-through, create a small one:
```sh theme={null}
mkdir -p ~/writing/quickstart
cat > ~/writing/quickstart/essay.md <<'EOF'
# A short essay
This is the first paragraph. It is fine but could be tighter.
This is the second paragraph. It rambles a bit.
EOF
```
## 2. Launch DocWriter
```sh theme={null}
docwriter --new-session ~/writing/quickstart
```
A browser tab opens at `http://localhost:7723`. The file tree on the left
shows `essay.md`.
## 3. Open the file
Click `essay.md` in the file tree. The contents appear in the editor in
the center. You can edit any text directly; keystrokes save
continuously.
 ## 4. Leave a note for the agent and keep going
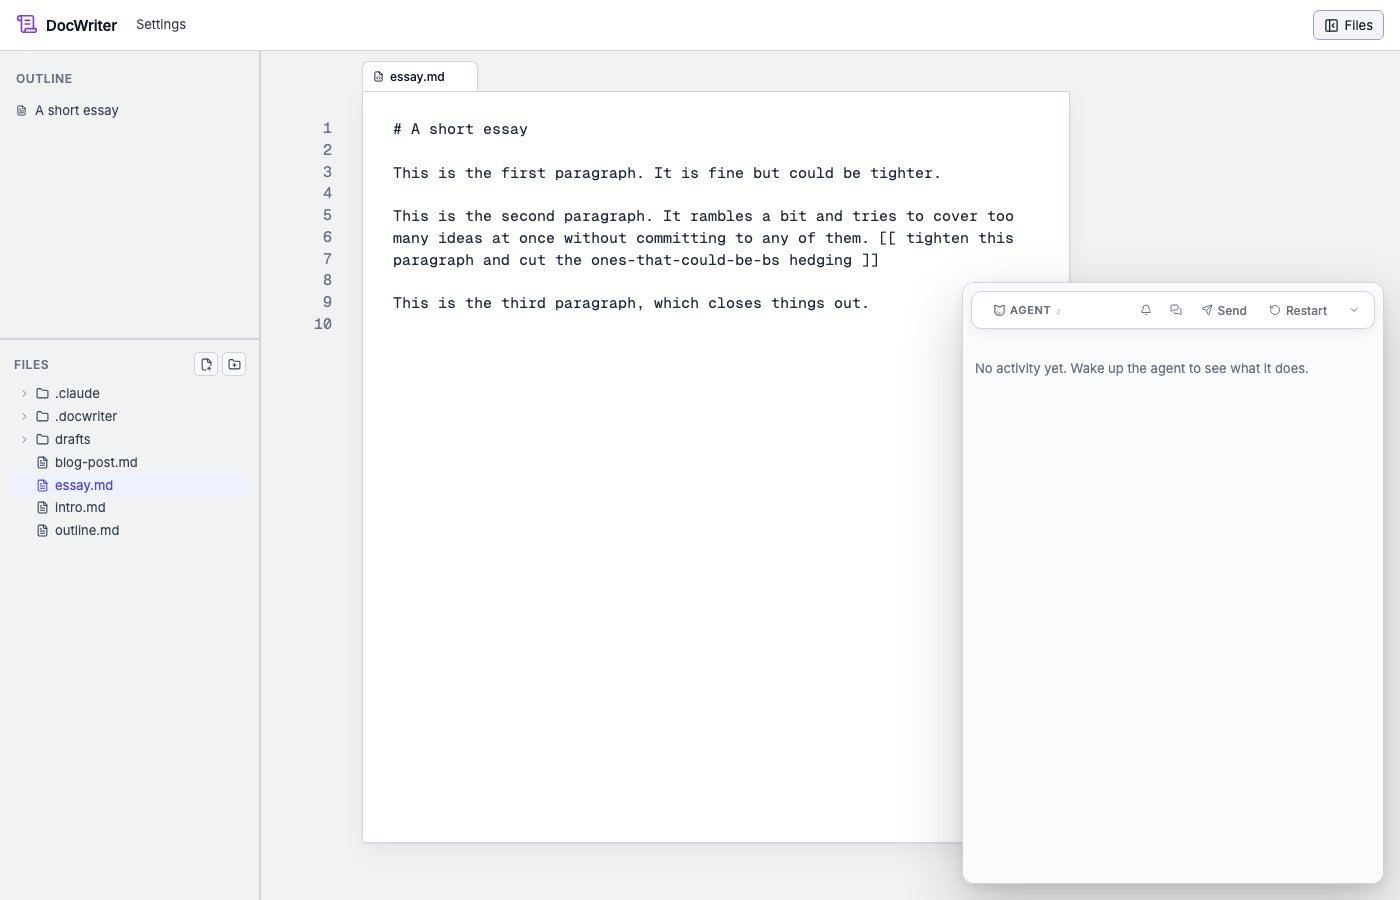
Anywhere in the document, type a bracketed note:
```md theme={null}
[[ tighten the second paragraph ]]
```
Keep writing. Add a sentence to the first paragraph, sketch a new
intro, whatever. You don't have to hit anything to "send" the
instruction. Three seconds after you stop typing, the agent wakes
automatically, reads the open file, finds the `[[ ... ]]`, handles
it, and deletes the directive text from the document. See [Inline
directives](/agent/inline-directives).
If you'd rather not wait the three seconds, `Cmd+Enter` (macOS) or
`Ctrl+Enter` (Linux/Windows) in the editor wakes the agent
immediately. For requests that don't anchor to a spot in the doc
("research X," "restructure across files"), click the **Send** button
in the top-right to open a chat popover.
## 5. Watch the edit arrive while you write
The agent runs in the background. You can keep typing while it works.
Edits flow in as they happen, and your typing isn't blocked.
When the agent finishes its revision, the change appears in your document
as a suggestion: the new text is highlighted, and a card appears in the
outline pane on the left titled "Pending edit".
## 4. Leave a note for the agent and keep going
Anywhere in the document, type a bracketed note:
```md theme={null}
[[ tighten the second paragraph ]]
```
Keep writing. Add a sentence to the first paragraph, sketch a new
intro, whatever. You don't have to hit anything to "send" the
instruction. Three seconds after you stop typing, the agent wakes
automatically, reads the open file, finds the `[[ ... ]]`, handles
it, and deletes the directive text from the document. See [Inline
directives](/agent/inline-directives).
If you'd rather not wait the three seconds, `Cmd+Enter` (macOS) or
`Ctrl+Enter` (Linux/Windows) in the editor wakes the agent
immediately. For requests that don't anchor to a spot in the doc
("research X," "restructure across files"), click the **Send** button
in the top-right to open a chat popover.
## 5. Watch the edit arrive while you write
The agent runs in the background. You can keep typing while it works.
Edits flow in as they happen, and your typing isn't blocked.
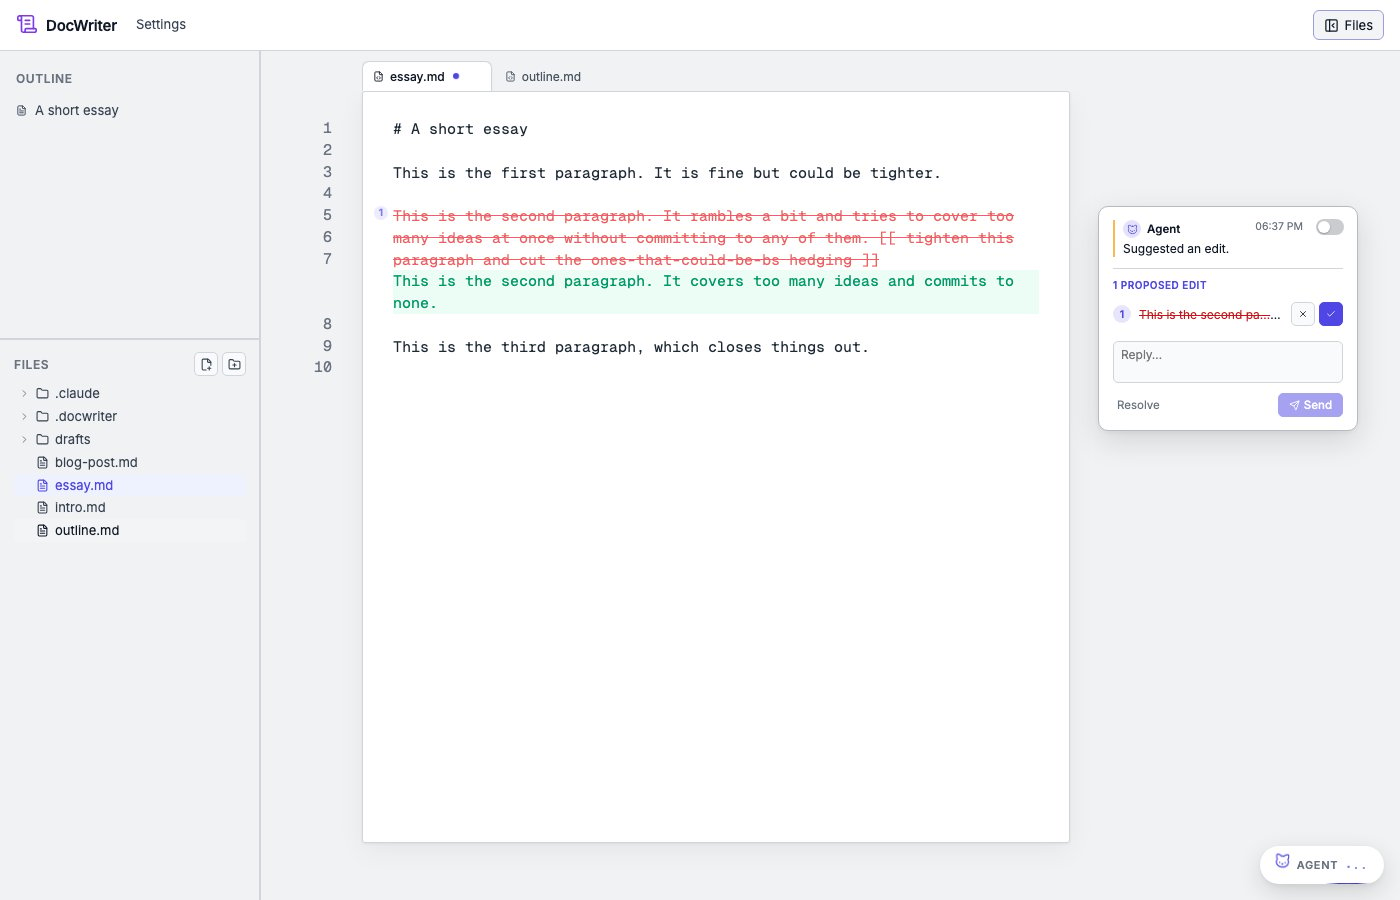
When the agent finishes its revision, the change appears in your document
as a suggestion: the new text is highlighted, and a card appears in the
outline pane on the left titled "Pending edit".
 ## 6. Accept, reject, or retry
The card has three buttons.
* **Accept** keeps the change.
* **Reject** discards it.
* **Retry with feedback** opens a small prompt. Type what was off about
the agent's edit ("too short", "kept the wrong example", "use past
tense") and submit. The agent reruns with your feedback.
Either accepting or rejecting preserves your own concurrent edits to
the first paragraph. The agent's change and your typing are merged
independently.
Two more things about pending edits:
* **Click the card** to scroll the editor to the spot the edit applies
to. Useful when you have several pending edits across a long
document.
* **Acceptance is FIFO.** If the agent proposes a sequence of changes,
only the oldest pending card shows an Accept button. Accept (or
reject) the oldest one and the next one becomes actionable. This
avoids the ambiguity of "accept change 2 while change 1 is still
pending" since change 2 might depend on change 1.
## 7. Inspect the history
The history pane on the right (toggle with the menu bar or the button at
the top-right) shows every tool call the agent made: which files it read,
what edits it proposed, and any errors. Useful when you want to understand
how the agent reached its result.
## Where to go next
You have run through one full editing cycle. From here:
* [Tour the interface](/tour/interface). What every part of the screen
does.
* [Steering the agent](/agent/steering-the-agent). Short prompts, model
selection, autonomy levels.
* [Reviewing edits](/agent/reviewing-edits). Accept and reject in detail,
undo, multiple pending rounds.
* [Hooks](/automation/hooks). Run shell commands on agent events
(recompile a PDF, push to git).
* [Writing a research-backed blog post](/guides/blog-with-research). The
marquee end-to-end walk-through.
* [Editing an Overleaf LaTeX project](/guides/overleaf). Same loop on a
LaTeX manuscript, with PDF preview and git push back to Overleaf.
## 6. Accept, reject, or retry
The card has three buttons.
* **Accept** keeps the change.
* **Reject** discards it.
* **Retry with feedback** opens a small prompt. Type what was off about
the agent's edit ("too short", "kept the wrong example", "use past
tense") and submit. The agent reruns with your feedback.
Either accepting or rejecting preserves your own concurrent edits to
the first paragraph. The agent's change and your typing are merged
independently.
Two more things about pending edits:
* **Click the card** to scroll the editor to the spot the edit applies
to. Useful when you have several pending edits across a long
document.
* **Acceptance is FIFO.** If the agent proposes a sequence of changes,
only the oldest pending card shows an Accept button. Accept (or
reject) the oldest one and the next one becomes actionable. This
avoids the ambiguity of "accept change 2 while change 1 is still
pending" since change 2 might depend on change 1.
## 7. Inspect the history
The history pane on the right (toggle with the menu bar or the button at
the top-right) shows every tool call the agent made: which files it read,
what edits it proposed, and any errors. Useful when you want to understand
how the agent reached its result.
## Where to go next
You have run through one full editing cycle. From here:
* [Tour the interface](/tour/interface). What every part of the screen
does.
* [Steering the agent](/agent/steering-the-agent). Short prompts, model
selection, autonomy levels.
* [Reviewing edits](/agent/reviewing-edits). Accept and reject in detail,
undo, multiple pending rounds.
* [Hooks](/automation/hooks). Run shell commands on agent events
(recompile a PDF, push to git).
* [Writing a research-backed blog post](/guides/blog-with-research). The
marquee end-to-end walk-through.
* [Editing an Overleaf LaTeX project](/guides/overleaf). Same loop on a
LaTeX manuscript, with PDF preview and git push back to Overleaf.